Advanced Typography - Exercises

Week 1-Week 3
Alfie Koh Chen Fong (0340310)
Advanced Typography
Exercises
LECTURE
Week 1(14/04/2020)
Due to MCO, our classes were conducted through online. The first session of Advanced Typography was conducted by Mr Vinod through Facebook live video. For the first session, Mr Vinod briefed us about our exercises and projects through MIB and followed by a lecture about "Typographic Systems".
There are 8 types of Typographic Systems were mentioned in lecture session.
1. Axial System- All elements are aligned to left or right side of a single axis. The axis may be straight, oblique, curve.
 |
| Fig 1.1 Axial System |
2. Radial System- All elements extend from one or more than one focus point.
 |
| Fig 1.2 Radial System |
3. Dilatational System- All elements encircle a focus point.
 |
| Fig 1.3 Dilatational System |
4. Random System- All elements are placed randomly with a reasonable manner,
 |
| Fig 1.4 Random System |
5. Grid System- All elements are placed fittingly in columns and grids.
 |
| Fig 1.5 Grid System |
6. Transitional System- All elements are placed rhythmically to create a layered banding.
| Fig 1.6 Transitional System |
7. Bilateral System- All element are placed symmetrically or centralized on a single axis.
 |
| Fig 1.7 Bilateral System |
8. Modular System- Similar to grid system but every text boxes must be same size as one another. At the same time, all boxes can switch their position.
 |
| Fig 1.8 Modular System |
There is a few notes I took down:
1. Before we start designing the layout, we need to choose system and follow the system's rules.
2. Consider the most important information.
3. For the typographic system exercises, graphics should be used limitedly.
3. Design 2 layouts for each system.
4.The design must include black, white and choose 1 another color.
5. Alignment must be logically.
6. Use the 9 type families given by Mr Vinod.
7. Ctrl+b to adjust the alignment such as top, bottom and centre.
Week 2(21/04/2020)
This week Mr Vinod briefed us about the next exercises,"Type and Play" which we need to use a photo for aspiration, dissect and analysis some letters from the photo and digitize it. He showed some of the letters that were designed based on movies.(Fig 1.9-Fig 2.1) The design of the letter shows the feeling it wants to be by it's characteristic, this is what we need to approach when designing our letter.
 |
| Fig 1.9 "Russian Doll" |
 |
| Fig 2.0 "Kelelawar Malam" which means bat night |
 |
| Fig 2.1 "What we do in the shadows" |
Week 3(28/04/2020)
This week's lecture session were conducted by some of my classmates which is group 3. Below is the presentation slides they presented during the class.
The presentation separates to three parts which are:
1. Form & Content
2. Gestalt Psychology & Layout
3. Creating VIsual Hierarchy
For the first part, we were lectured about the definition of form, how form relate to typography, how form and content work together and form follow function. Form follow functions is a principle mentioned by architect Louis Sullivan, he explained the design should based on the purpose of the object. The second part is about six individual principles commonly associated with gestalt theory whih is similarity, continuation, closure, proximity, figure/ground and symmetry & order. The last part explain about how can we create herarchy using different size, color, spacing, typeface and composition.
Week 4(05/05/2020)
For this week's lecture, lecturer try a different way which is record the lecture video early. The topic is about context and creativity. After watching the lecture video, I learned about the importance of handwriting, development of letter in different area.
 |
| Fig 2.2 Evolution of Middle Eastern Alphabets |
 |
| Fig 2.3 Evolution of Chinese words |
 |
| Fig 2.4 Evolution of the Latin alphabets |
 |
| Fig 2.5 The hieroglyphics chart of the ancient Egypt |
Week 5(12/05/2020)
Today group 2 had a lecture section talking about "Designing Type". The slides divided to 6 parts which is:
1. Anatomy of Type
2. General Procsee of Designing Type
3. How to Think Before Drawing
4. Construction of Components
5. Characteristics of a good type design
6. Different Processes & Approaches that 3 Different Designers Go Through
INSTRUCTION
Exercises
(1)Typographic System
Week 1(14/04/2020)
Week 1(14/04/2020)
For the first exercise, we need to design 8 types of design following the Typographic System: Axial, Radial, Random, Dilatational, Grid, Bilateral, Transitional and Modular. The content is given inside MIB.
The Design School, Taylor’s University
All Ripped Up: Punk Influences on Design
or
The ABCs of Bauhaus Design Theory
or
Russian Constructivism and Graphic Design
Open Public Lectures:
November 24, 2020
Lew Pik Svonn, 9AM-10AM
Ezrena Mohd., 10AM-11AM
Suzy Sulaiman, 11AM-12PM
November 25, 2020
Muthu Neduraman, 9AM-10AM
Fahmi Reza, 10AM-11AM
Fahmi Fadzil, 11AM-12PM
Lecture Theatre 12
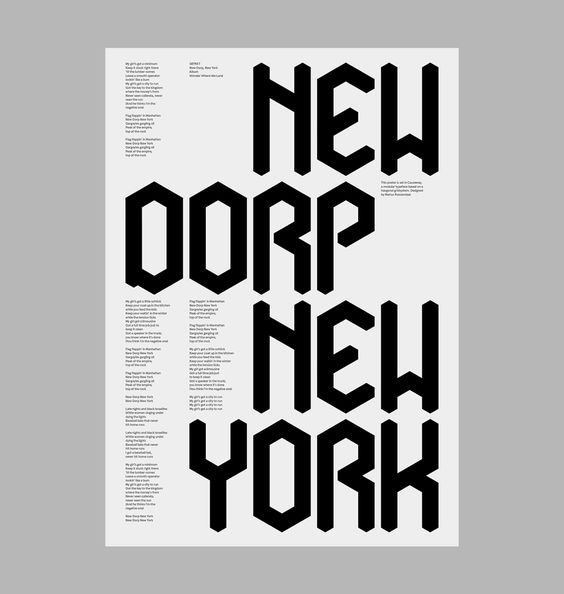
The first system I started was Axial system which I need to place the contents on the left or right side of a axis. For my designs, I tend to grab the attention of viewer by bold typeface and try to make the important information clear and readable. I only used red, black and white these three color for my designs because I think these colors are able to make a good visual contrast. Below is my first attempt of Axial system.

 |
| Fig 2.0 Radial System (First attempt) |
 |
| Fig 2.1 Dilatational System (First attempt) |
 |
| Fig 2.2 Random System (First attempt) |
 |
| Fig 2.3 Grid System (First attempt) |
 |
| Fig 2.4 Transitional System (First attempt) |
 |
| Fig 2.5 Modular System (First attempt) |
 |
| Fig 2.6 Bilateral System (First attempt) |
This week, I showed my design to lecturer. After a run through, they had some suggestion for my design. Below are the systems that facing problems.
1. Axial- For the axial system, lecturer think I can decrease the size of the date which is less than 12pt.
2. Random- They think I should improve it and make it more random feeling.
3.Bilateral- I should try to make it more interesting. For the right design, increase the point size of the title. Mr Shamsul suggested that move the word "The Design School" below to the red box.
Based on their reflection, I also had a look to some classmates' design that were admired by lecturers.
Below is some improvement I made for my designs.
 |
| Fig 2.7 Axial System (Before) |
 |
| Fig 2.8 Axial System (After) |
 |
| Fig 2.9 Random System (Before) |
 |
| Fig 3.0 Random System (After) |
 |
| Fig 3.1 Bilateral System (Before) |
 |
| Fig 3.2 Bilateral System (After) |
Below is my final submission for exercise Typographic System.
 |
| Fig 3.3 Radial System (Final Submission for Typographic System) |
 |
| Fig 3.4 Dilatational System (Final Submission for Typographic System) |
 |
| Fig 3.5 Random System (Final Submission for Typographic System) |
 |
| Fig 3.6 Grid System (Final Submission for Typographic System) |
 |
| Fig 3.7 Transitional System (Final Submission for Typographic System) |
 |
| Fig 3.8 Modular System (Final Submission for Typographic System) |
 |
| Fig 3.9 Bilateral System (Final Submission for Typographic System) |
 |
| Fig 4.0 Axial System (Final Submission for Typographic System) |
(2) Type & Play
Part 1
Week 3(28/04/2020)
In this exercise, to extract the potential of the letterform, we were assigned to select an image, analyse and dissect letters from it. Then, we need to digitize the letter. We should digitize the letters from a crude presentation to a more refined pattern, make sure the origin of the letter still exist in the final work. I choose a image of trunk because I feel interested in the texture. I started dissect and analysis it carefully, there are 5 letters I found which are (F, E,T, Y, C) (Fig 4.1-4.7)
 |
| Fig 4.1 The image of trunk I selected for my exercise |
 |
| Fig 4.2 Five letters are founded which are F, E, T, Y, C |
 |
| Fig 4.3 The letter "E" |
 |
| Fig 4.4 The letter "C" |
 |
| Fig 4.5 The letter "T" |
 |
| Fig 4.6 The letter "F" |
 |
| Fig 4.7 The letter "Y" |
Before started the exercise, I filled the letters with black color to make the comparison of reference font more easier.(Fig 4.8 - 4.9) I choose Universe Lt Std 55 Roman as the reference of my font.(Fig 4.10)
 |
| Fig 4.8 Five Crude letters with stroke only |
 |
| Fig 4.9 Five letters with black color |
| Fig 4.10 Crude letters compare to the reference Universe Lt Std 55 Roman |
I plan to approach the size of my letters to the reference, I used guide line to make this step more easier. (Fig 4.11)
Fig 4.11 Approach to the size of reference
|
Below is the final refined letters.(Fig 4.12)
 |
| Fig 4.12 Refined letters |
Below is the step of refining, top is the original letters extracted from the image, middle is the second step of refining and the bottom are the refined letters.
 |
| Fig 4.13 Crude letters until refined letters |
I showed my letters to lecturers, Mr Vinod thinks the refined letters lose the origin characteristic. He suggested me find the characteristic between all the letters and use it to develops my letters. After receiving the feedback, I started edit my letters. This time I focus on the crack and consistent all my letters based on a characteristic. (Fig 4.14)
| Fig 4.14 The final refined letters |
 |
| Fig 4.15 The steps of refinement |
 |
| Fig 4.16 The steps of refinement included artboard |
 |
| Fig 4.17 Final letter "F" |
 |
| Fig 4.18 Final Letter "E" |
 |
| Fig 4.19 Final Letter "T" |
 |
| Fig 4.20 Final Letter "Y" |
 |
| Fig 4.21 Final Letter "C" |
Embeded pdf of all letters
Part 2
Week 4(05/05/2020)
For the part 2 of the exercise "Type & Play", we were assigned to select a n image of object/structure/people/nature. We need to combine a sentence with this image with a suitable design which can explain/express the sentence very clearly.
There are some of the instructions given by lecturer we need to follow such as:
1. The size of image should be A4.
2. Use the 10 typefaces given by lecturer.
3. The sentence better around 4-5 words.
After referencing to some seniors' exercises, I start searching the image in https://unsplash.com/t/wallpapers which providing a lot high quality images. After a searching, I decided to use this image for my exercise.(Fig 4.22) I like this kind of art style such as Vaporwave. I believe that when everyone was in primary school, if your teacher asks about students' aspirations, astronaut will be one of the most popular occupation chosen. So the first sentence come to my mind is "Don't Stop Dreaming".
 |
| Fig 4.22 "Astronaut" |
Before I start designing the image with the sentence, I need to adjust the size of image to A4 following Mr Vinod's instruction. (Fig 4.23) Next, to confirm the process of designing will be easier, I selected the astronaut and divided it to another layer which can make my design more convenient. (Fig 4.24)
 |
| Fig 4.23 Adjust the size of image to A4 size |
 |
| Fig 4.24 Select the astronaut and make a new layer for it |
For the sentence's typeface, I chose my favourite typeface which is Itc Garamond Std in ultra narrow italic. I decided to place the word "DON'T" above the astronaut with a big font size first.(Fig 4.26) Next, I found that the head of astronaut can be a substitution for "O" of the word "STOP", so I placed "ST P" at the two sides of astronaut's head.(Fig 4.26)
 |
| Fig 4.25 Placing the word "DON'T" above the astronaut |
 |
| Fig 4.26 I use the head as the word "O" of "STOP" |
I decided to let the word "DREAMING" circumfuses the astronaut because I believe dream is always be with a people. I curve the word and use the ripple effect to make it dreamlike. This is the hardest part for this exercise because it is hard to curve the word properly.(Fig 4.27-4.30)
 |
| Fig 4.27 Try to curve the word "DR" |
 |
| Fig 4.28 Try to curve the word "E" |
 |
| Fig 4.29 Placed "M" behind the astronaut |
 |
Fig 4.30 The word "DREAMING" circumfuse the astronaut
|
Below is the first attempt of part 2 of exercise Type & Play. (Fig 4.31)
 |
| Fig 4.31 First attempt of part 2 of Type & Play exercise |
I showed my first attempt to lecturers, they think I need to change the typeface because it is not adapting with the image. Mr Vinod suggested choose a futuristic typeface, also I should change the background.
I changed the typeface to Serifa Std 56 Italic which is more futuristic. Also, I changed the background to a space which is more suitable for an astronaut. Below is the second attempt. (Fig 4.32- 4.34)
 |
| Fig 4.32 I chose another background which is space |
 |
| Fig 4.33 Changed typeface and background |
 |
| Fig 4.34 Second attempt of exercise 2 (Part 2) |
 |
| Fig 4.35 Third attempt of exercise 2(Part 2) |
Mr Vinod still not satisfy in my third attempt, he said the typeface is not convincing with the background. The whole design looks too simple, he think I only can get 2.5 points out of 4.
This time I tried to change the position of the words. I tried to create more movements and added gradient color into the words. I placed the word "dreaming" at the right side because I think that the left hand of astronaut is pointing to the word so he can help me to bring the attention of audience to the word. Below is the final outcome.(Fig 4.36)
 |
| Fig 4.37 Final outcome of exercise 2(Part 2) |
Embed pdf of exercise 2(Part 2)
FEEDBACK
Week 1(14/04/2020)
General Feedback:
We need to consider the most important information before design the layout and pay attention to the hierarchy. Graphics should be used limitedly hence we can prevent the attention of viewers are attracted by the graphics. The point size of the contents should be 8pt-12pt followed by the leading which need to increase more 2.5pt than the point size. For this exercises, only black, white and one another color should be used. Alignment must be logically and we must use the 9 type families which were mentioned by Mr Vinod.
We need to consider the most important information before design the layout and pay attention to the hierarchy. Graphics should be used limitedly hence we can prevent the attention of viewers are attracted by the graphics. The point size of the contents should be 8pt-12pt followed by the leading which need to increase more 2.5pt than the point size. For this exercises, only black, white and one another color should be used. Alignment must be logically and we must use the 9 type families which were mentioned by Mr Vinod.
Specific Feedback:
No specific feedback given by lecturer because we haven't start doing our exercises in the first week.
Week 2(21/04/2020)
General Feedback:
Pay attention to what lecturers said to other's work, the problems may occur in our designs also. So make sure we pay attention and solve the problem immediately.
Specific Feedback:
For my exercise 1's designs, Mr Vinod had some suggestion. For the axial system, I need to downsize the dates. For the random system, he think the random feeling is not enough, improve it. For the bilateral system, he suggest me to make the layout more interesting, also increase the point size of the title.
Week 3(28/04/2020)
General Feedback:
Keep the characteristic of the letters is one of the most important things during exercise 2. Make sure the characteristic still exist in the final outcome.
Specific Feedback:
For my exercise 2's design, Mr Vinod think I lost the characteristic of the letters at the final outcome. He suggested me to use many line of crack to create the letters. Also, try to figure out the characteristic of my letters from the images and develop it until the final outcome.
Week 4(05/05/2020)
General Feedback:
The type in the poster must reflect in the image and consider a suitable typeface for the poster.
Specific Feedback:
For my exercise 2, Mr Vinod the typeface is not adapting the background. He suggested me consider another typeface which is futuristic. I should change a suitable background also.
Week 5(12/05/2020)
General Feedback:
We need to pay attention when its during our group's feedback section, during other groups' feedback section we can do our work and turn on the audio so that we can listen to the feedback given and improve our works at the same time.
Specific Feedback:
For my exercise 2, typeface still not convincing. Whole design is too simple although the word "dreaming" have movement. Mr Shamsul said I haven't add the further reading in my blog.
REFLECTION
Week 1(14/04/2020)
Experience:
I think online e-learning class is a bit challenging because we can't communicate with classmates and lecturers face-to-face. One of the biggest problem we may face during online class is network connection. It is a good way that lecturer record the video to prevent if we have any miss out or absent problem during the class.
Observation:
Sometimes the video being laggy or the screen being cut off. During the class, one of the classmates didn't response Mr Vinod's asking. This made Mr Vinod knew that the student is not paying attention to the class. There is a good function of zoom call screen sharing so we can watch lecturer criticize the deisgn and understand the reason of design very clearly.
Findings:
I think online lecture session don't have any different compare to study at campus and I feel more comfortable to study at my home. Online class is better then what I thought before the commence of the semester.
Week 2(21/04/2020)
Experience:
I feel nervous when I showed my designs to lecturer because I am not really confident in myself. I am glad that lecturers think some of my designs are good, this give me some motivation for the another work and make myself more confident.
Observation:
Most of my classmates have good designs in their exercises 1. I think I should ask them when I face problems on my works.
Findings:
I think the feedback session for the exercise 1 is the most important session for me. By the feedback given by lecturer, I can understand the problems very clearly from the works. I will pay more attention when lecturer is giving feedback to others' works.
Week 3(28/04/2020)
Experience:
I feel the volume of lecturer in the Facebook live is a bit low. I think it is because I didn't wear earphone, but I placed my earphones at KL and recently my home doesn't have any earphone that can be used. So I open the Facebook live in my smartphone since it is louder and watching through my laptop at the same time to make sure I can clearly see the contents lecturer showed.
Observation:
By focusing Mr Vinod giving the feedback to my classmates' works, I can easily found the same problems occur in my design. This is a very helpful part for me in the class. Respect how our lecturer keep learning the information he don't know from my classmates.
Findings:
I think use Zoom is better for the class because more interaction is able to done. Some of my classmates' exercise 2 have a very excellent appearance. The details and efforts showed in their works will be the lesson I need to learn.
Week 4(05/05/2020)
Experience:
This week's lecture section was recorded early, I think this is a good way to make the online class more flexible. This week we got more time to focus on the feedback for the works.
Observation:
Some of my classmates have a lot creativity on their works. They always design something I never imagine and their design looks very attractive, I think creativity is one of a good think to make my design better.
Findings:
Without lecture section I feel more focused during the class, maybe "doing" is more bracing compare to "studying". But I still think lecture section is a important element to improve myself.
Week 5(12/05/2020)
Experience:
My classmates have some suggestions for the online class to improve the online learning experience.
The reply of lecturer is really helpful during this online class period.
Observation:
This week's presentation is presented very details and some extra informations also provided in the group.
Findings:
We should have a good management in time for the heavy works. I am not satisfying on my position now. I think I still need to put more effort when doing my works so I can improve it further and better.
FURTHER READING
Week 1(14/04/2020)
Book Title: The Fundamentals of Typography
Author: Gavin Ambrose & Paul Harris
 |
| Fig 1.01 The Fundamentals of Typography |
I have learned about "Fraction" in this book. Fraction can be represented in two ways depending upon how the bar separating the numerator and denominator is presented. Fraction may be nut or en fractions with a horizontal bar, or em fractions with a diagonal bar.
Diagonal or em fractions: More pleasing to the eye and are commonly with expert sets. There are also called em fractions as the bar is an em in length.(Fig 1.02)
En fractions, horizontal or nut fractions: En fractions have a bar that is an en in length. Over time, en fractions have been referred to as nut fractions to avoid confusion with the em fractions.(Fig 1.02)
 |
| Fig 1.02 The comparison of Nut/En/Horizontal fractions and Em/Diagonal fractions |
Week 2(21/04/2020)
Book Title:The Fundamentals of Typography
Author:Gavin Ambrose & Paul Harris
 |
| Fig 1.03 The Fundamentals of Typography |
This week I continued the further reading with this book also. For this week, I have learned about
measurement of typoraphy. Typography uses two types of measurement, absolute measurement and relative measurement.
Relative measurement: The character spacing are directly linked to typesize which means that they are defined by series ofrelative(rather than absolute) measurement. The basic building block for typographical character, the em, is a relative measurement. Type set at 70pt has a 70pt em. Tyoe set at 40 has a 40pt em. (Fig 1.04)
 |
| Fig 1.04 Measurement of type |
Week 3(28/04/2020)
Book Title:The Visual Dictionary of Typography
Author: Gavin Ambrose & Paul Harris
 |
| Fig 1.05 The Visual Dictionary of Typography |
For this week's further reading, I decided to read The Visual Dictionary of Typography. Some of the information mentioned in this book.
Fist: A decorative typographical device or symbol used for pointing at or highlighting a certain element of a piece of text or image. Fist also called a printer's hand. (Fig 1.06)
Fleuron: Fleuron are ornamental character based on the shapes of flowers, leaver and other floral motifs. They are used for decorative purposes, such as border and breaks to separate different contents. Fleuron are not to be confused with other special typographical symbols, such as pi character or dingbats.(Fig 1.07)
 |
| Fig 1.06 Fist |
 |
| Fig 1.07 Fleuron |
Week 4(05/05/2020)
Book Title: Exploring Typography
Author: Tova Rabinowitz
 |
| Fig 1.08 Exploring Typography |
For this book, I learn how to make the text to be legible, there is a variety of factors can influence the legibility of print on a page or on a computer screen. Understand these things will allow us to make informed choices that will result in more effective and successful designs. Considering these issues will help us to balance legibility concern with stylistic demands in ways that will ultimately contribute to the readability of our designs.
1. Style of a typeface: Some typefaces may be legible when used as display type(larger and/or decorative type used to attract attention; generally used for titles, headings, or headlines), but illegible when used for body type(textual passages longer than a few words, also called text typo or body text).
2. Familiarity: Typefaces that are more familiar can be read more quickly and easily than unfamiliar ones. For example, blackletter typeface is a typeface that we unfamiliar and not legible for modern audience.
3. Type style: A type style refers to a modified version of a typeface. For instance, text could be set in italic, bold, ALL CAPS, or underlined type styles. Most type styles are very useful for emphasis and work well for display types. However, long passages of body type should rarely be set in one of these type styles.


Comments
Post a Comment